How to Install Fonts on Linux: Methods and Tips
Wondering how to enhance the typography on your Linux system? This guide will walk you through the ins and outs of installing fonts on Linux, providing insights into different methods, troubleshooting tips, and optimizing font usage for a seamless visual experience.
Understanding Font Installation on Linux
Before we dive into the installation process, let’s grasp the fundamentals of font installation on Linux. Fonts play a crucial role in defining the visual aesthetics of your system. Whether you’re a designer, developer, or simply someone with a keen eye for design, customizing fonts allows you to personalize your Linux experience.
Checking System Requirements
Ensuring a smooth font installation begins with checking your system’s requirements. Verify that your Linux distribution is up-to-date, as font handling may vary across different releases. This ensures compatibility and reduces the likelihood of installation hiccups.
```bash

sudo apt-get update && sudo apt-get upgrade # Update the package list and upgrade installed packages

```
Exploring Font Formats
Linux supports various font formats, including TrueType (TTF), OpenType (OTF), and Type 1 (PFA/PFB). Understanding these formats helps you choose the right font for your specific needs. Each format has its strengths, and compatibility with Linux applications may vary.
Manual Installation Method
For those who prefer a hands-on approach, manually installing fonts is a straightforward process. Download the desired font files, and then copy or move them to the appropriate font directory. This method provides flexibility, allowing you to organize fonts according to your preferences.
```bash

cp ~/Downloads/myfont.ttf /usr/share/fonts/truetype/ # Copy the downloaded font to the TrueType font directory

```
Explore in this guide how to install PHP on Linux
Using Package Managers
Linux package managers streamline font installation by automating the process. Leveraging package managers like `apt` (for Debian-based systems) or `yum` (for Red Hat-based systems) simplifies font acquisition and ensures that dependencies are handled seamlessly.
```bash

sudo apt-get install fonts-noto # Install the Noto font family using apt

```
Installing Fonts System-Wide
Want your newly installed fonts to be available system-wide? Learn how to install fonts globally, making them accessible to all users on the system. This approach is ideal for users who want a consistent visual experience across different applications.
```bash

sudo cp ~/Downloads/myfont.ttf /usr/share/fonts/truetype/ # Copy the font to the system-wide TrueType font directory

sudo fc-cache -f -v # Update the font cache

```
Install fonts easy with this tutorial
Customizing Fonts for Specific Applications
Certain applications may require specific font configurations. Explore how to customize fonts for individual software, ensuring optimal readability and aesthetics. Whether it’s your code editor or a graphic design tool, tailoring fonts enhances the user experience.
```bash

echo "editor.fontFamily: 'Monospace 12'" >> ~/.config/your-code-editor/settings.conf # Adjust font settings for your code editor

```
Troubleshooting Font Installation Issues
Encountering issues during font installation? Dive into troubleshooting techniques to identify and resolve common problems. From missing dependencies to incorrect file permissions, these solutions will help you navigate through potential obstacles.
```bash

sudo fc-cache -f -v # Refresh the font cache to resolve font rendering issues

```
Utilizing Font Management Tools
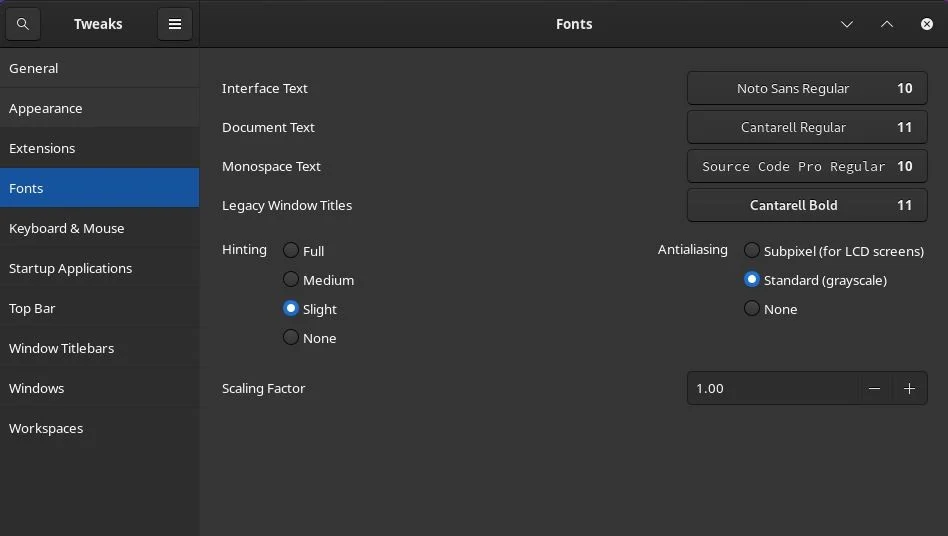
Discover the convenience of font management tools that simplify the organization and activation of fonts. These tools offer graphical interfaces, allowing you to preview, install, and uninstall fonts effortlessly. Explore options like Font Manager or GNOME Font Viewer for an enhanced font management experience.
```bash

sudo apt-get install font-manager # Install Font Manager using apt

```
Ensuring Font Compatibility with Linux Software
Not all fonts play well with every Linux application. Learn how to ensure compatibility with popular software by configuring font settings. Whether you’re working with office suites, web browsers, or design software, optimizing font compatibility enhances visual coherence.
```bash

echo "export GDK_USE_XFT=1" >> ~/.bashrc # Ensure compatibility with GTK applications

```
How to Uninstall Fonts on Linux
Decided to part ways with a font? Uninstalling fonts on Linux is a breeze. Follow a simple process to remove fonts and maintain a clean, clutter-free font library on your system.
```bash

sudo rm /usr/share/fonts/truetype/myfont.ttf # Remove the font from the system-wide TrueType font directory

sudo fc-cache -f -v # Update the font cache

```
Listing Installed Fonts
To view a list of installed fonts on your Linux system, you can use the following command:
bash
fc-list
This command will display a comprehensive list of all installed fonts, including their file paths, styles, and more. It’s a handy way to verify your font management and removal efforts.
Tracking Font Changes with Fc-Cache
The fc-cache command, used for updating the font cache after installations or removals, can also help track font changes on your system. By running the command with the -v (verbose) option, you can get detailed information about the caching process:
bash
sudo fc-cache -f -v
This will provide insights into any alterations in the font cache, helping you ensure that your font removals take effect as intended.
Discovering New Fonts
Now that you’ve mastered the art of uninstalling fonts, why not explore new fonts to freshen up your Linux experience? Online repositories and websites like Google Fonts offer a vast selection of fonts compatible with Linux.
Downloading Fonts from Google Fonts
Let’s say you’ve found a font on Google Fonts that you’d like to add to your Linux system. You can use the following commands to download and install it:
bash
wget https://fonts.google.com/download?family=yourfontfamily -O yourfont.zip # Download the font unzip yourfont.zip -d ~/.fonts # Unzip and move the font to the user-specific font directory fc-cache -f -v # Update the font cache
This process ensures that the newly downloaded font is available for use across your Linux applications.
Improving Font Rendering in Web Browsers
Enhancing font readability in web browsers can significantly improve your overall online experience. Consider adjusting font rendering settings in your browser for a cleaner and crisper text display.
Firefox Font Rendering Optimization
Open Firefox and type about:config in the address bar. Search for gfx.font_rendering.cleartype_params.rendering_mode and set it to 5 for improved font rendering.
bash

echo "user_pref(\"gfx.font_rendering.cleartype_params.rendering_mode\", 5);" >> ~/.mozilla/firefox/profile_name/user.js
Restart Firefox to apply the changes.
Chrome Font Rendering Optimization
For Google Chrome, open the browser and go to chrome://flags/. Find the “LCD text antialiasing” setting and select “Enabled.” Relaunch Chrome to experience enhanced font rendering.
Customizing Terminal Font and Colors
Your terminal’s appearance greatly influences the readability of text-based content. Tailor your terminal font and color scheme for a personalized and visually comfortable experience.
Adjusting Terminal Font Size and Style
bash

sudo nano /etc/default/console-setup # Open the console setup configuration file
Modify the FONTFACE and FONTSIZE parameters to set your preferred font face and size. Save the changes and reboot for the adjustments to take effect.
Customizing Terminal Color Scheme
bash

nano ~/.bashrc # Open the Bash configuration file
Append color codes to customize the terminal color scheme. For example, add export PS1=”\[\e[1;33m\]\u@\h \[\e[1;34m\]\w\[\e[0m\]\$ ” to set a yellow username and blue path.
bash

source ~/.bashrc # Apply the changes
Exploring Font Rendering in Graphics Applications
Graphics applications often have specific font rendering settings. Let’s explore how to optimize font rendering in the popular graphics editor, GIMP.
GIMP Font Rendering Optimization
Launch GIMP and navigate to Edit > Preferences > Interface > Theme > Customize…. Here, adjust the “Text Hinting” and “Text Antialiasing” options for improved font rendering.