Installing Curl on Linux: A Step-by-Step Guide
Curl stands as a versatile instrument, serving the purpose of facilitating data transfer across a multitude of protocols. Regardless of your role, be it a developer, system administrator, or a passionate enthusiast, gaining proficiency in the art of installing Curl on Ubuntu can significantly enhance the efficiency of your web interactions. This comprehensive guide will escort you through a seamless procedure to successfully set up Curl on your Ubuntu system.
How to Install cURL on Linux: A Comprehensive Guide
Welcome to the world of Linux and the powerful utility known as cURL. In this guide, we’ll walk you through the step-by-step process of installing cURL on your Linux machine. Whether you’re a Linux novice or a seasoned user, this guide will ensure a smooth installation process.
Step 1: Open a Terminal
Your journey begins by accessing the command-line interface, or terminal, on your Linux system. This is where you’ll issue commands to install cURL. The method for opening a terminal varies slightly depending on your Linux distribution, but here are some common options:
- Ctrl+Alt+T Shortcut: A quick and universal method to open the terminal is by pressing Ctrl+Alt+T simultaneously;
- Application Launcher: If you prefer a graphical approach, simply search for “Terminal” in your application launcher or menu;
- Desktop Context Menu: Right-click on your desktop and select “Open Terminal” to summon the command-line environment.
Step 2: Update Package Lists
Before diving into the installation, it’s crucial to ensure that your system’s package lists are up to date. By refreshing these lists, you make sure that you’re fetching the latest version of cURL and its dependencies. Depending on your Linux distribution, use one of the following commands to accomplish this:
For Debian/Ubuntu Based Systems:
sudo apt updateFor Red Hat/CentOS Based Systems:
sudo yum updateFor Fedora Systems:
sudo dnf updateUpdating your package lists is an essential preparatory step that avoids potential compatibility issues and ensures you have access to the most recent features and security updates.
Step 3: Installing cURL
Now that you have a terminal open and your package lists updated, it’s time to proceed with the installation of cURL. This versatile tool allows you to make HTTP requests, transfer data, and perform various network-related tasks. To install cURL, use the package manager associated with your Linux distribution:
For Debian/Ubuntu Based Systems:
sudo apt install curlFor Red Hat/CentOS Based Systems:
sudo yum install curlFor Fedora Systems:
sudo dnf install curlStep 4: Verification
After the installation is complete, it’s a good practice to verify that cURL is working correctly. You can do this by running the following command:
curl --versionThis will display the installed cURL version and confirm that the installation was successful.
Step 5: Exploring cURL
Congratulations! You now have cURL installed on your Linux system, and you’re ready to explore its vast capabilities. Here are some additional tips and insights to get you started:
- Basic Usage: Use cURL to fetch web pages, download files, or interact with APIs by issuing commands like curl https://example.com;
- HTTP Methods: You can perform various HTTP methods like GET, POST, PUT, DELETE, and more with cURL. Explore these options to interact with web services effectively;
- Scripting: Incorporate cURL commands into scripts to automate tasks such as data retrieval, monitoring, or testing;
- Configuration: Customize cURL’s behavior with flags and options. Refer to the cURL documentation or use curl –help to explore the available features.
Read about the seamless process of how to install PostgreSQL on Linux, unlocking powerful database management for your projects!
How to Install Curl on Linux: Process
When it comes to powerful data transfer and retrieval capabilities on your Linux system, cURL is the go-to tool. In this guide, we’ll walk you through the installation process for cURL on different Linux distributions and ensure you can verify the installation for a seamless experience.
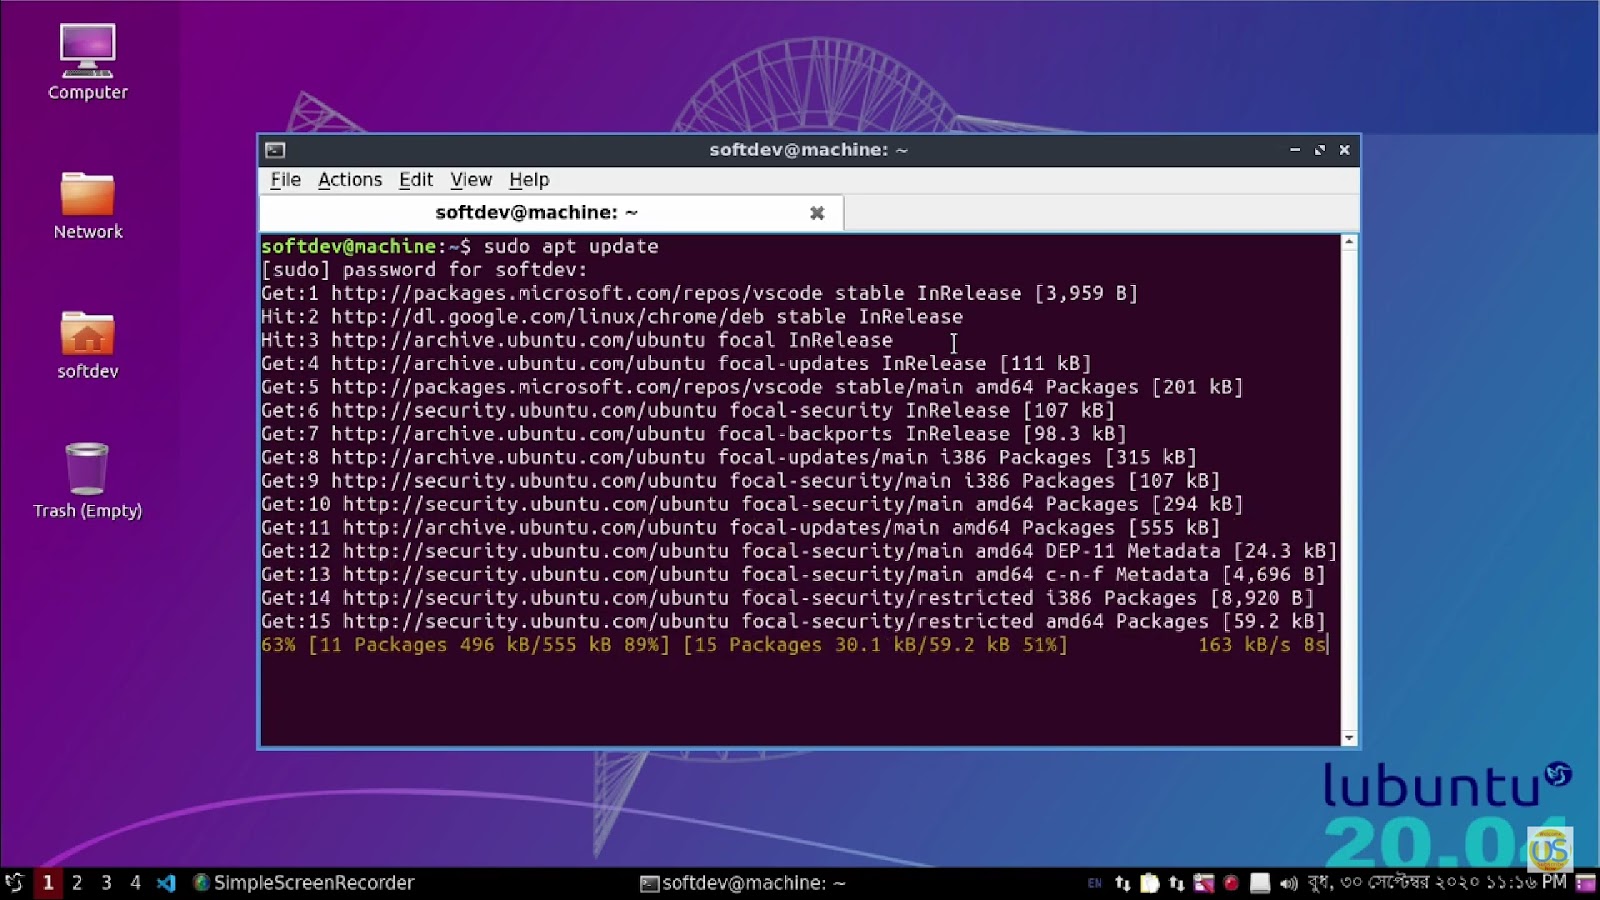
Step 1: Updating Package Lists
Before diving into the installation process, it’s crucial to ensure your package lists are up to date. This ensures that you’re working with the latest information and dependencies. To do this, open your terminal and execute the following command:
sudo apt update        # For Debian/Ubuntu

sudo yum update        # For Red Hat/CentOS

sudo dnf update        # For Fedora
Step 2: Installing cURL
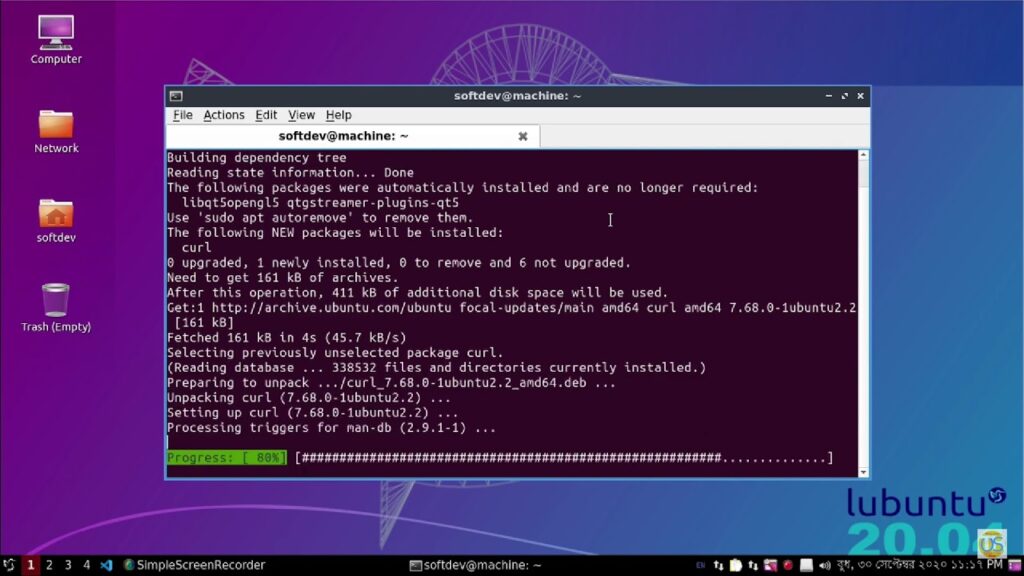
Now that your package lists are refreshed, let’s proceed with installing cURL. Use one of the following commands based on your Linux distribution:
For Debian/Ubuntu:
sudo apt install curlFor Red Hat/CentOS:
sudo yum install curlFor Fedora:
sudo dnf install curlThese commands will download and install cURL along with its necessary dependencies. The installation process might take a moment, so be patient.
Step 3: Verification
Once the installation is complete, it’s essential to verify whether cURL has been successfully installed. This step ensures that everything is in working order. To do this, run the following command in your terminal:
curl --versionThis simple command will display valuable information about cURL, including its version and other essential details, confirming a successful installation.
How to Install Curl on Linux: Mastering Curl – Unlocking the Power of Command-Line Requests
cURL, short for “Client URL,” is a versatile command-line tool that can be your Swiss Army knife for web-related tasks. Once you have cURL installed, a world of possibilities opens up for you, from making HTTP requests to downloading files and interacting with APIs. Here, we’ll dive deep into these functionalities and provide you with comprehensive insights and tips to harness the full potential of cURL.
Making a GET Request: Fetching Web Content
cURL excels at making GET requests to websites, allowing you to retrieve web content with ease. To get started, use the following syntax:
curl https://example.comPro Tips:
- You can use the -i option to include HTTP response headers in the output for debugging purposes;
- Save the response to a file for later analysis: curl -o output.html https://example.com
Downloading a File: Seamlessly Fetching Resources
Need to download a file from the web? cURL is your trusty companion. Simply use the -o option followed by the desired file name:
curl -o filename.ext https://example.com/file.extPro Tips:
- Ensure reliable downloads with the -C – option, which resumes interrupted downloads;
- Specify the user-agent with -A to mimic different browsers for server compatibility.
Sending Data in a POST Request: Interacting with APIs
cURL’s prowess extends to sending data in POST requests, a crucial capability for API interactions. For instance:
curl -X POST -d "key1=value1&key2=value2" https://example.com/apiPro Tips:
- Use the -H option to set custom headers, essential for authenticating with APIs;
- Encode data with URL-encoding or JSON format based on the API’s requirements.
Handling Authentication: Securing Your Requests
Securing your cURL requests is vital when interacting with password-protected resources. To provide credentials, use the -u option:
curl -u username:password https://example.com/protectedPro Tips:
- If you don’t want to expose your password in the command history, use -u username and cURL will prompt you for the password securely.
Handling Cookies: Managing Session Data
Cookies are essential for maintaining sessions when interacting with websites. cURL makes it a breeze to handle cookies:
curl -c cookies.txt -b cookies.txt https://example.com/login
Pro Tips:
- Save cookies to a file with -c and load them with -b for seamless session management;
- Combine cookie handling with authentication for authenticated sessions.
Advanced Options: Fine-Tuning Your cURL Commands
cURL offers a plethora of advanced options and features, allowing you to fine-tune your commands for specific scenarios:
- User-Agent: Set a custom user-agent with -A to mimic different clients;
- Follow Redirects: Automatically follow HTTP redirects with -L;
- Timeouts: Specify connection and data transfer timeouts with -m and –max-time;
- Proxy Support: Use -x to route requests through a proxy server;
- Verbose Mode: Enable verbose output for debugging with -v.
How to Install Curl on Linux: Troubleshooting Installation and Usage
Even with the most straightforward tools, you might encounter issues or errors when using ‘curl’ in Linux. In this comprehensive guide, we will delve into common problems you may face during ‘curl’ installation and usage, along with solutions to resolve them. ‘curl’ is a powerful command-line tool for transferring data with URLs, and understanding these issues can enhance your experience.
1. ‘curl’ Command Not Found
Problem: If you encounter the ‘curl: command not found’ error, it indicates that ‘curl’ is not installed on your system.
Solution: To resolve this issue, you can install ‘curl’ using various methods:
- Package Manager (apt, yum, or dnf):
- On Debian/Ubuntu-based systems, use: sudo apt-get install curl;
- On Red Hat/Fedora-based systems, use: sudo yum install curl;
- On CentOS 8 and newer, or Fedora 22 and newer, use: sudo dnf install curl;
- Compile from Source: Download ‘curl’ source code from the official website and follow the compilation instructions.
2. SSL Certificate Errors
Problem: When using ‘curl’ to download files from an HTTPS website, SSL certificate errors may occur due to self-signed certificates, expired certificates, or certificates from untrusted authorities.
Solution: You can bypass SSL certificate verification by using the ‘-k’ or ‘–insecure’ option with ‘curl.’ However, use this cautiously, especially for sensitive data, as it compromises SSL security. Example:
curl -k https://self-signed.badssl.com/3. Slow Download Speed
Problem: Experiencing slow download speeds with ‘curl’ can be attributed to network congestion or a sluggish server.
Solution: You can optimize download speed using ‘-Y’ (minimum download speed) and ‘-y’ (timeout) options. For instance, to abort a download if the speed drops below 1000 bytes per second for 20 seconds:
curl -O -Y 1000 -y 20 https://example.com/big-file.zip4. Verbose Mode for Debugging
Problem: When troubleshooting ‘curl’ commands, additional information about ‘curl’s actions can be invaluable in pinpointing issues.
Solution: Employ the ‘-v’ or ‘–verbose’ option with ‘curl’ to enable verbose mode. This mode provides a detailed log of the connection and HTTP request. Example:
curl -v https://example.com